Integrate Google Sheets with Slack Using Google Apps Script: Automate Notifications Easily
- Those who want to save time and effort by automating Slack notifications.
- Those who want to eliminate manual communication errors.
If you want to be notified in Slack when you change the input status of a spreadsheet, wouldn’t it be a hassle to send a notification manually every time?
Even if the work per notification does not take much time, it becomes more difficult as the number of notifications increases.
So, in this article, we will show you how to use Google Apps Script to link spreadsheets and Slack and automate notifications.
This eliminates the need for manual notification and facilitates information sharing.
In addition, a Slack webhook URL is required in advance of executing this Google Apps Script.
If you have not yet obtained the URL, please refer to this article.

Completed image
Spreadsheet

Slack Notification

- Slack notifications when spreadsheet entry status changes
- Fill in the spreadsheet with Slack notifications
In this example, the sheet name is “Sales Management” and Slack will be automatically notified when the payment status in the spreadsheet is updated.
Payment has been completed for the products ordered by the customer,
“Order ID #003, Alex Johnson’s order has been marked as paid. Please proceed with the shipping preparation.”
A notification like this will be sent to Slack.
This notification allows the person in charge to proceed to the next step and prevents manual miscommunication.
Procedure
Create the Script

First, open the spreadsheet.
In this example, the sheet name is “Sales Management” and is referenced during Apps Script execution.
Example of column input
| Column A | Order ID |
| Column B | Customer Name |
| Column C | Order Date |
| Column D | Product Name |
| Column E | Quantity |
| Column F | Amount (USD) |
| Column G | Payment Status |
| Column H | Payment Date |
| Column I | Delivery Status |
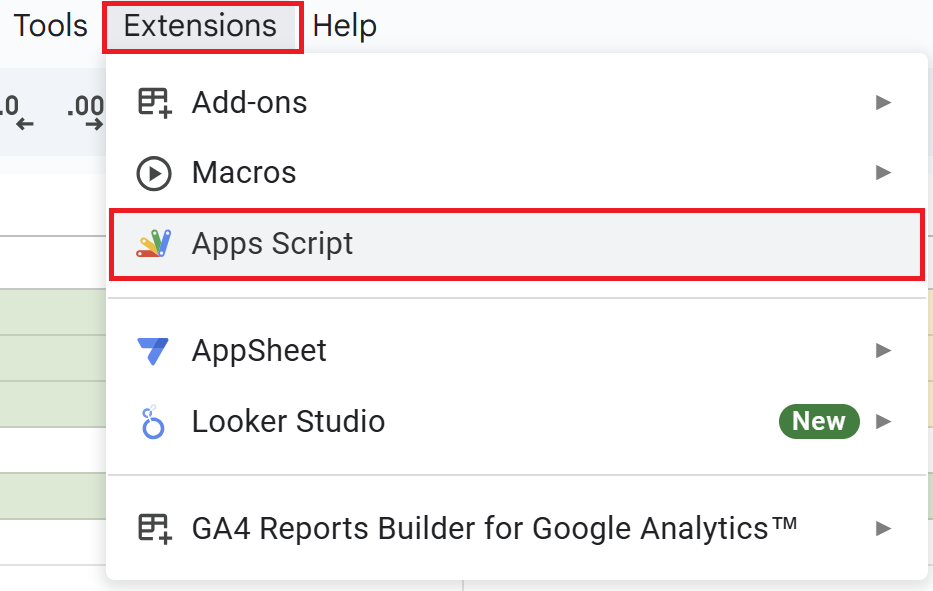
Open a Google Spreadsheet and click on “Extensions” in the menu, then “Apps Script” to open the Apps Script editor.
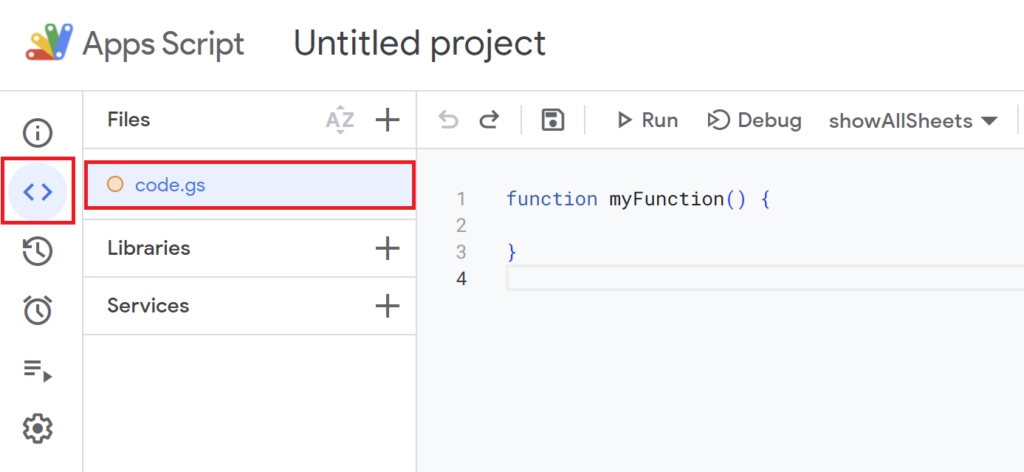
function myFunction(){
}
is included from the beginning, so delete it and paste the previous script.
function notifySlack() {
  var sheet = SpreadsheetApp.getActiveSpreadsheet().getSheetByName('Sales Management'); // Sheet name: Sales Management
  var range = sheet.getDataRange();
  var data = range.getValues();

  for (var i = 1; i < data.length; i++) { // Start from the second row (skip header)
    var orderId = data[i][0]; // Order ID (Column A)
    var customerName = data[i][1]; // Customer Name (Column B)
    var paymentStatus = data[i][6]; // Payment Status (Column G)
    var notifiedStatus = data[i][9]; // Notification Status (Column J, mark as "Notified")

    // If the payment status is "Paid" and the notification has not been sent yet
    if (paymentStatus === 'Paid' && notifiedStatus !== 'Notified') {
      var message = 'Order ID #' + orderId + ', ' + customerName + '\'s order has been marked as paid. Please proceed with the shipping preparation.';
      sendSlackNotification(message);

      // Mark as notified in the spreadsheet
      sheet.getRange(i + 1, 10).setValue('Notified');
    }
  }
}

function sendSlackNotification(message) {
  var url = 'https://hooks.slack.com/services/XXXXXXXXX/XXXXXXXXX/XXXXXXXXXXXXXXXXXXXX'; // Set your Slack Webhook URL
  var payload = {
    'text': message
  };
  var options = {
    'method': 'post',
    'contentType': 'application/json',
    'payload': JSON.stringify(payload)
  };
  UrlFetchApp.fetch(url, options);
}
Script Description
- notifySlack() function
-
function notifySlack() { var sheet = SpreadsheetApp.getActiveSpreadsheet().getSheetByName('Sales Management'); // Sheet name: Sales Management var range = sheet.getDataRange(); var data = range.getValues(); for (var i = 1; i < data.length; i++) { // Start from the second row (skip header) var orderId = data[i][0]; // Order ID (Column A) var customerName = data[i][1]; // Customer Name (Column B) var paymentStatus = data[i][6]; // Payment Status (Column G) var notifiedStatus = data[i][9]; // Notification Status (Column J, mark as "Notified") // If the payment status is "Paid" and the notification has not been sent yet if (paymentStatus === 'Paid' && notifiedStatus !== 'Notified') { var message = 'Order ID #' + orderId + ', ' + customerName + '\'s order has been marked as paid. Please proceed with the shipping preparation.'; sendSlackNotification(message); // Mark as notified in the spreadsheet sheet.getRange(i + 1, 10).setValue('Notified'); } } } - Get sheet and set data range
-
- Get the “Sales Management” sheet using
SpreadsheetApp.getActiveSpreadsheet().getSheetByName('Sales Management'). - Please change the sheet name as necessary.
getDataRange()retrieves all data ranges in a sheet, andgetValues()retrieves the values in that range as a two-dimensional array.
- Get the “Sales Management” sheet using
- Data iteration
-
- Use a
forloop to iterate from the second to the last line (skip the first line because it is a header line). - Get “Order ID (column A),” “Customer Name (column B),” “Payment Status (column G),” and “Notified Status (column J)” from each row.
- Use a
- Verify terms and conditions and Slack notifications
-
- If the “Payment Status” is “Paid” and not “Notified”, a notification will be sent to Slack.
- Create a notification message and call the
sendSlackNotification()function to send the notification. - After notification, record “Notified” in the “Notified” column of the appropriate line.
- sendSlackNotification(message) function
-
function sendSlackNotification(message) { var url = 'https://hooks.slack.com/services/XXXXXXXXX/XXXXXXXXX/XXXXXXXXXXXXXXXXXXXX'; // Set your Slack Webhook URL var payload = { 'text': message }; var options = { 'method': 'post', 'contentType': 'application/json', 'payload': JSON.stringify(payload) }; UrlFetchApp.fetch(url, options); } - Slack Webhook URL Settings
-
- Set the
urlvariable to the Slack webhook URL. - This URL is the URL of the Incoming Webhook configured in Slack.
- Set the
- Creation of notification content
-
- Sets the message to be notified to the
payloadobject. - The argument
messageis used here to specify the text to be sent to Slack.
- Sets the message to be notified to the
- Request Option Settings
-
- The
optionsvariable is used to configure HTTP request settings. methodis POST,contentTypeis JSON format, andpayloadis the message content converted to a JSON string.
- The
- Send request to Slack
-
Send notifications to Slack using
UrlFetchApp.fetch(url, options).This function can be used to send an HTTP request to a specified URL.
function sendSlackNotification(message) {
  var url = 'https://hooks.slack.com/services/XXXXXXXXX/XXXXXXXXX/XXXXXXXXXXXXXXXXXXXX'; // Set your Slack Webhook URL
A webhook URL is required to send notifications to Slack.
'https://hooks.slack.com/services/XXXXXXXXX/XXXXXXXXX/XXXXXXXXXXXXXXXXXXXX'
Replace this part with the Webhook URL you obtained yourself.
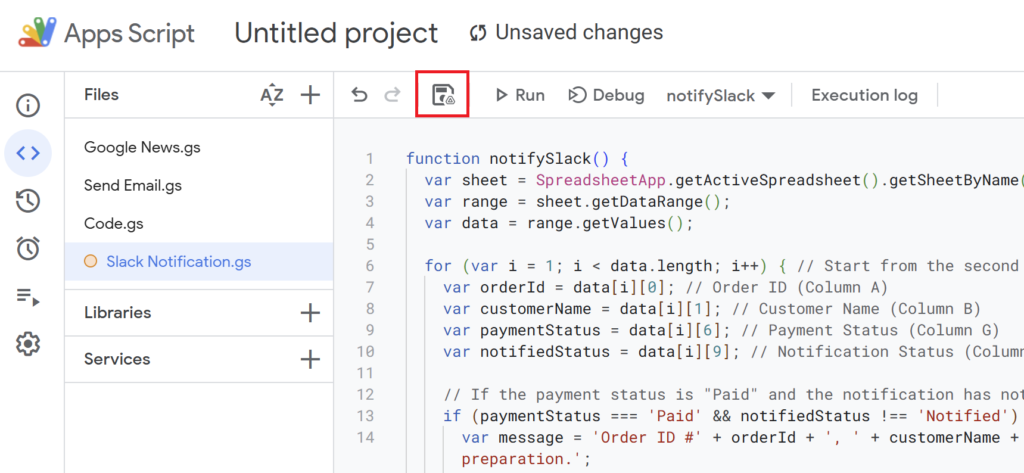
After writing the script, name and save it.
(e.g., “Slack Notification”)
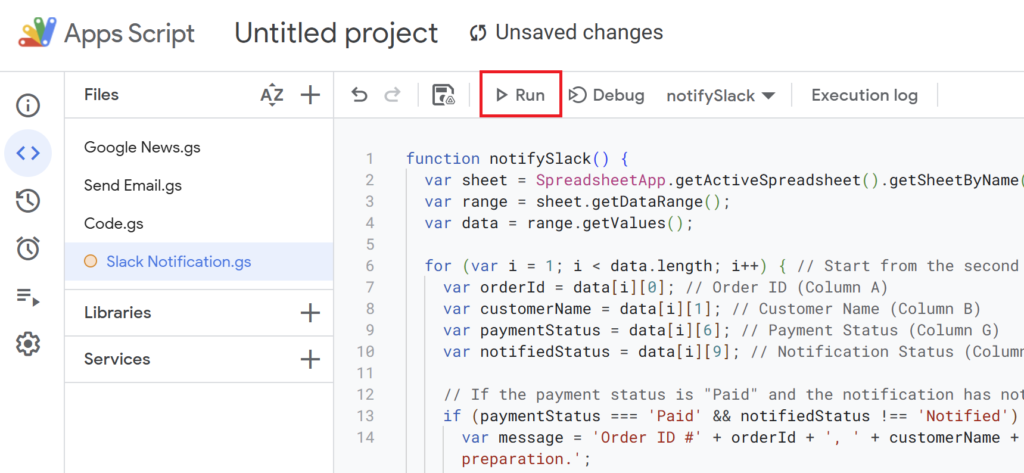
Run the script and notify Slack.
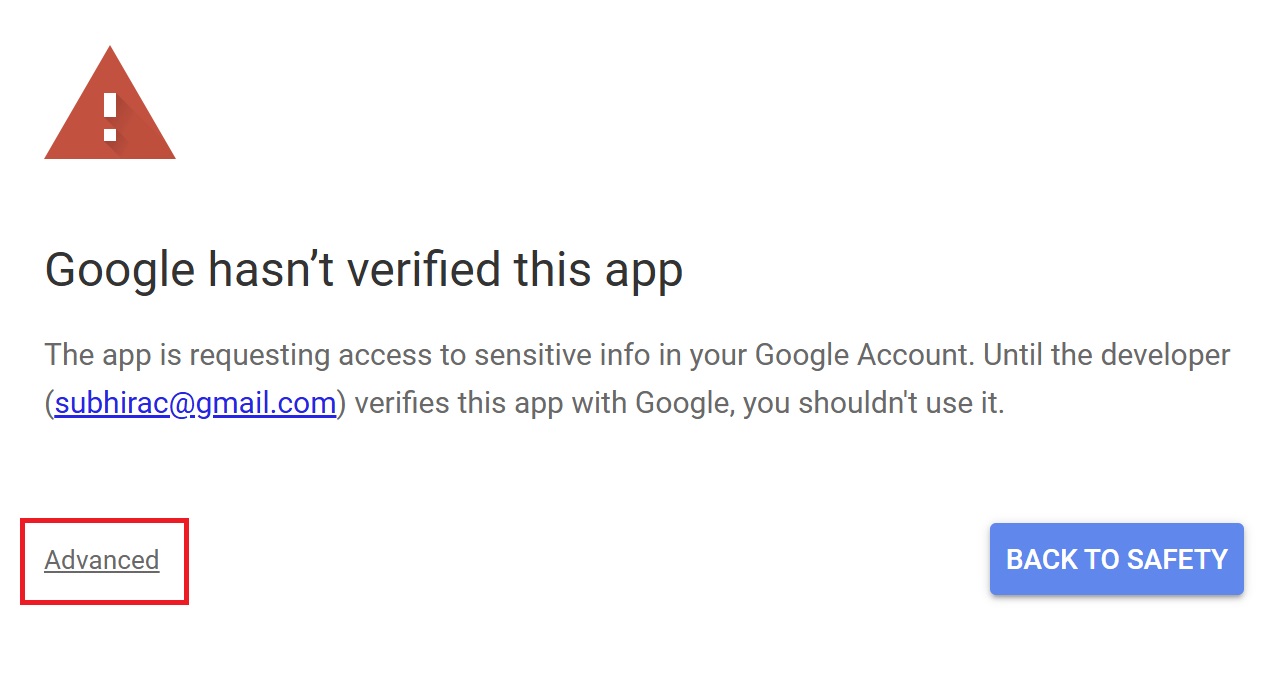
If you’re running the script for the first time, you need to authorize it.
Therefore, press “Review Permissions.“

Detailed Authorization Steps
Press “Advanced.”
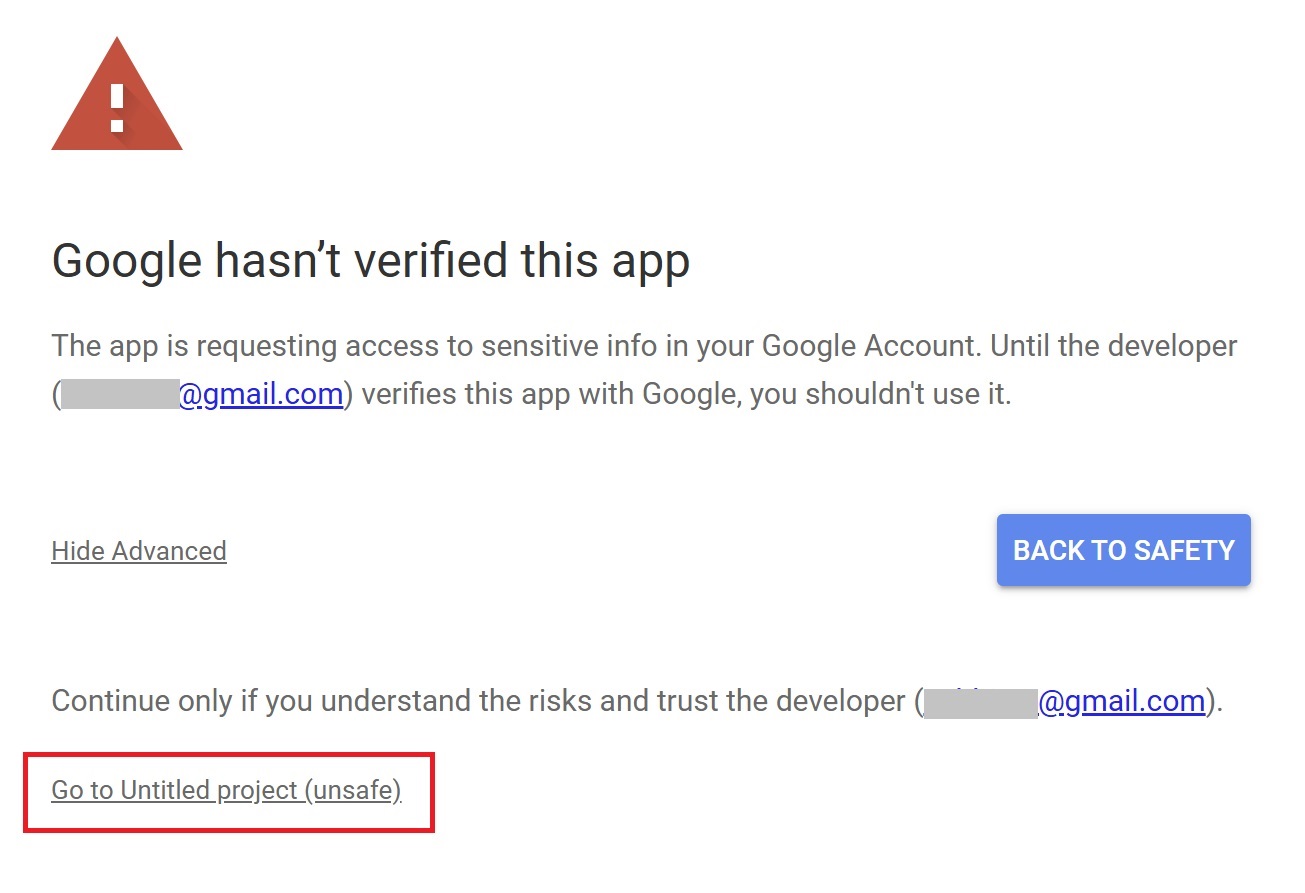
Press “Go to Untitled project (Unsafe).”
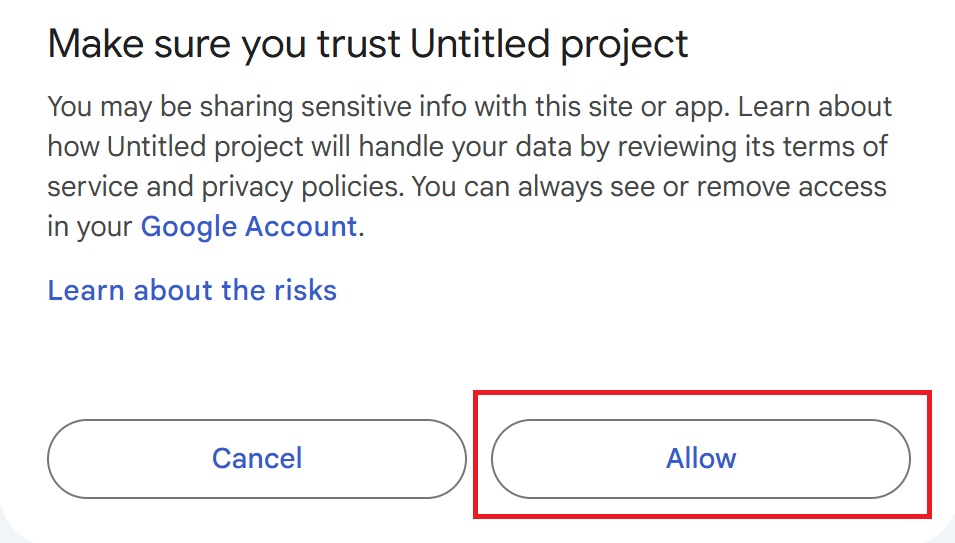
After that, press “Allow.”

Slack will be notified to the channel you specified when acquiring the Webhook URL.

In column J of the spreadsheet, the word “Notified” is entered.
Trigger settings (e.g., run Apps Script every hour)
Set up periodic Slack notifications
Once the script is working properly, the next step is to set up a trigger to run the notification periodically.
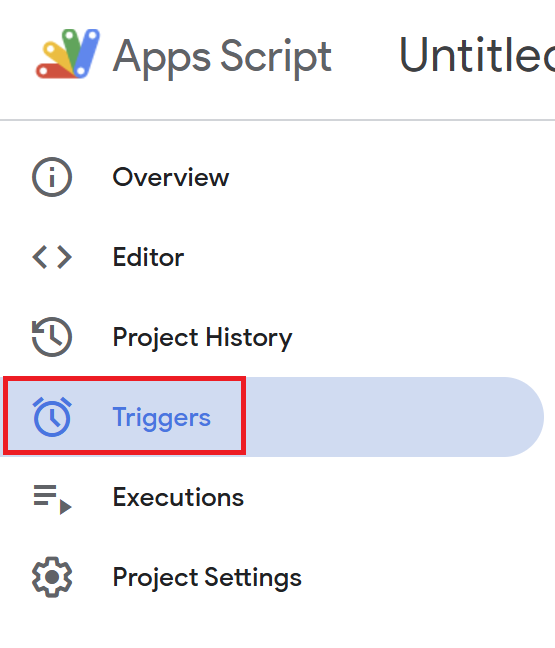
Select “Triggers” from the “Clock Icon”.
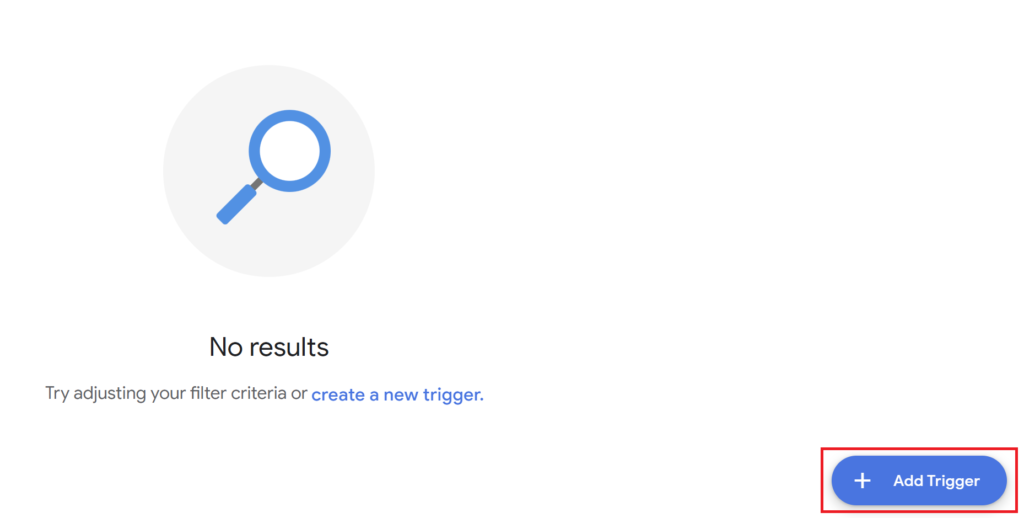
Press the “Add Trigger” button and configure as follows
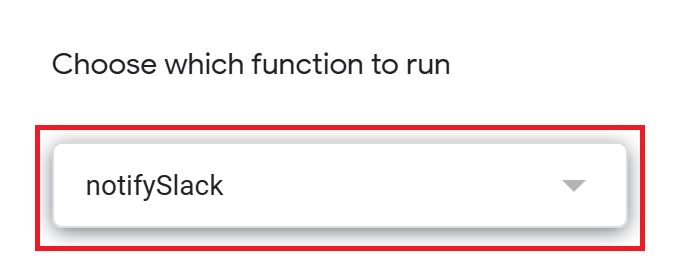
Select notifySlack as the function to execute.
(The item below it, “Choose which deployment should run” remains Head)
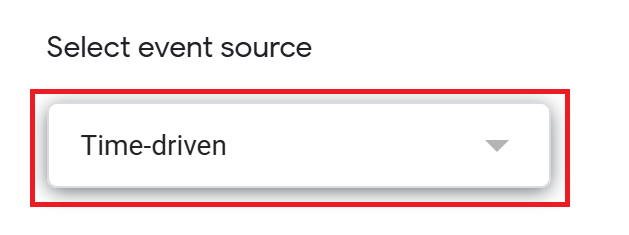
Select “Time-driven” as the event source.
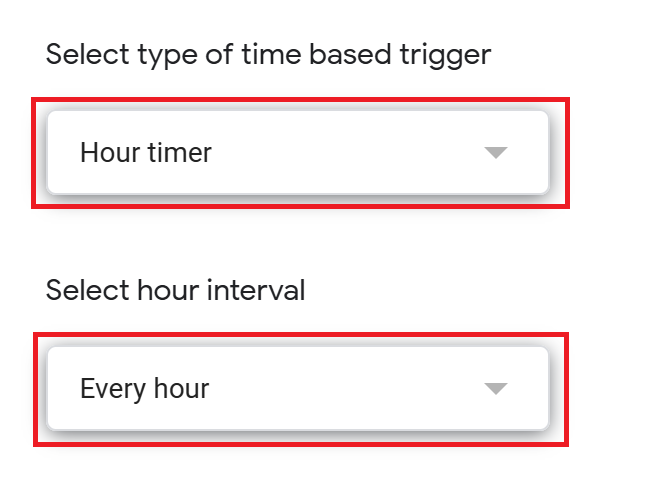
In this example, we have set it up so that a check is made in the spreadsheet every hour.
It can be set to minute-based or day-based, depending on your preference.
When settings are complete, click the “Save” button to activate the trigger.
This completes the trigger setup.
Trigger settings allow for periodic notifications to be sent to Slack when there is an update to the payment status.
Conclusion
- Slack Webhook URL is required in advance
- Slack notification when input status in spreadsheet changes
- Set triggers to periodically check inside the spreadsheet
In this article, we showed you how to use Google Apps Script to link a spreadsheet with Slack to automatically notify you of payment status updates.
Automating Slack notifications facilitates information sharing within the team and saves time and effort.
The script can be modified for other notification purposes.
We hope you will take advantage of it.
Our company offers support for improving work efficiency through the use of Google Apps Script.
If you need assistance with Google Apps Script customization or error resolution, please feel free to contact us.
We are fully committed to supporting your business improvements.
Contact us here






Comments