How to Insert Timestamps in Google Sheets and Practical Use Cases

Have you ever found yourself wondering, “When was this data entered?” or needing to track records of email sending or file deletion in your Google Sheets?
Using timestamps can simplify your workflow by keeping a clear record of your activities, making it easier to track progress and monitor actions.
In this article, we’ll introduce how to insert timestamps in Google Sheets and explore practical use cases to help streamline your work.
Practical Use Cases for Timestamps
- Recording Data Entry
- Tracking Progress in Approval Workflows
- Managing Attendance and Work Hours
- Addressing Errors or Troubleshooting Issues
By using timestamps, you can maintain a clear activity history, making it easier to monitor the progress of tasks and manage your workflow efficiently.
Recording when data is entered or modified provides better clarity on the workflow, enabling more informed and timely decision-making.
- Recording Data Entry
-
By logging the exact time of data entry, you can easily track who entered what information and when. This facilitates smoother progress management of tasks.
- Tracking Progress in Approval Workflows
-
In approval processes, recording timestamps at each step of the workflow makes it easier to monitor the progress and identify how far along the process is.
- Managing Attendance and Work Hours
-
Timestamps can be used to accurately log employee check-in and check-out times, enabling straightforward and efficient attendance management.
- Addressing Errors or Troubleshooting Issues
-
When errors occur, recording timestamps provides valuable information that can aid in identifying and resolving problems effectively.
Three Ways to Insert Timestamps
Method 1: Manually Inserting Timestamps
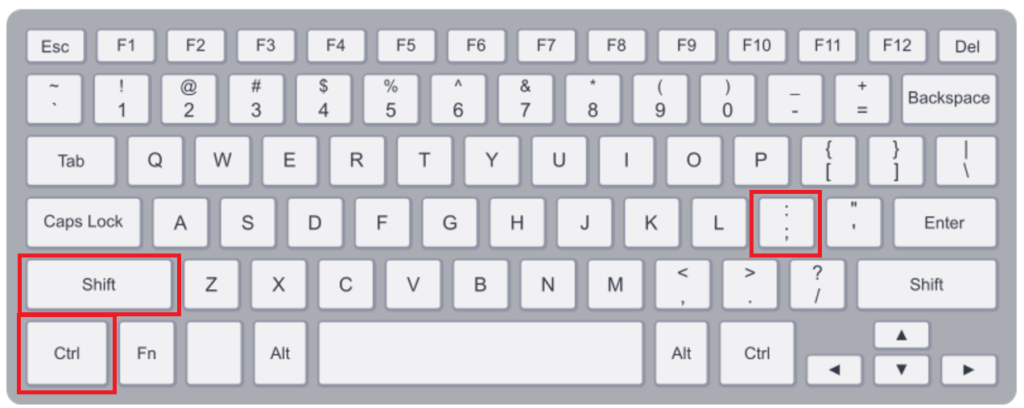
Using keyboard shortcuts:
For Date: Ctrl +;
For Time: Ctrl + Shift + ;
Using keyboard shortcuts is convenient when you want to manually record a timestamp at a specific moment, such as for logging check-in and check-out times.
Methods 2 & 3: Automatically Adding Timestamps (Using Google Apps Script)
Method 2: Automatically Inputting Timestamps When a Cell is Edited

You can use Google Apps Script (GAS) to automate the insertion of timestamps. By leveraging the onEdit trigger, a timestamp is automatically added whenever a cell is edited.
For example, the following script records a timestamp in column C whenever there is an entry in column B:
function onEdit(e) {
  var sheet = e.source.getActiveSheet();
  var range = e.range;
  if (range.getColumn() == 2) { // Checks if column B is edited
    sheet.getRange(range.getRow(), 3).setValue(new Date()); // Adds timestamp in column C
  }
}
Script Description
- onEdit(e) function:
-
- This function is triggered automatically whenever a cell is edited in the sheet, thanks to the
onEdittrigger.
- This function is triggered automatically whenever a cell is edited in the sheet, thanks to the
e.source.getActiveSheet():-
- Retrieves the sheet where the edit occurred.
e.range:-
- Captures the range of the edited cell (including its row and column).
if (range.getColumn() === 2):-
- Ensures that the subsequent actions are executed only when a cell in column B is edited. This line checks if the edited cell belongs to column B.
timestampCell.setValue(new Date()):-
- Records the current date and time as a timestamp in column C.
How to Run the Script
Since onEdit is an automatically triggered function, you don’t need to manually execute the Google Apps Script after saving it. It will run automatically whenever a cell is edited.
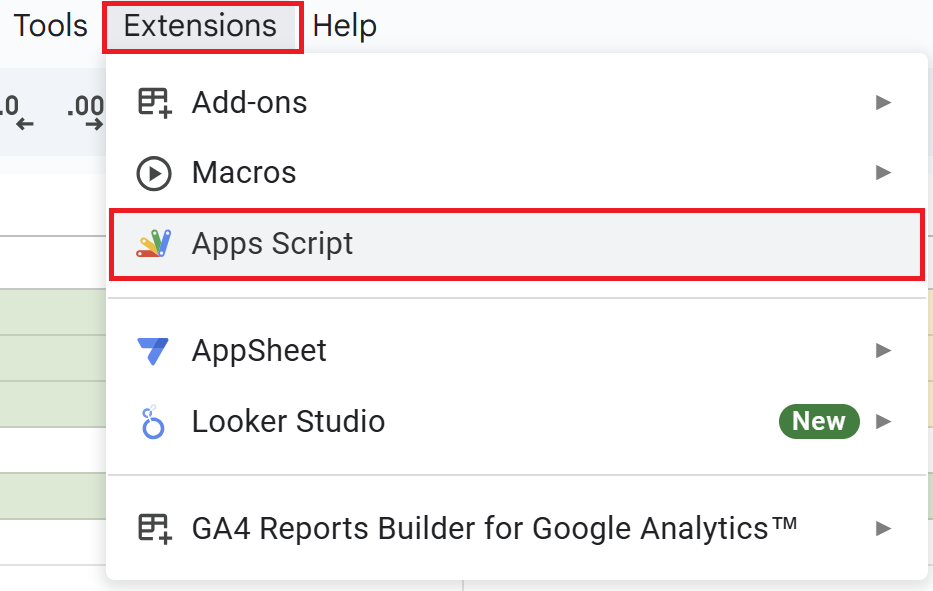
Open a Google Spreadsheet and click on “Extensions” in the menu, then “Apps Script” to open the Apps Script editor.
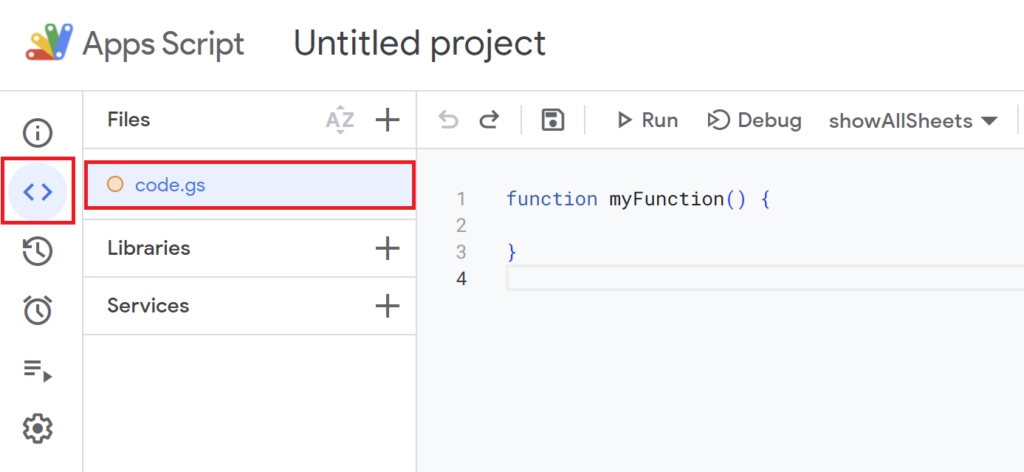
Since the default function myFunction() {} is present, delete it and replace it with the script above.
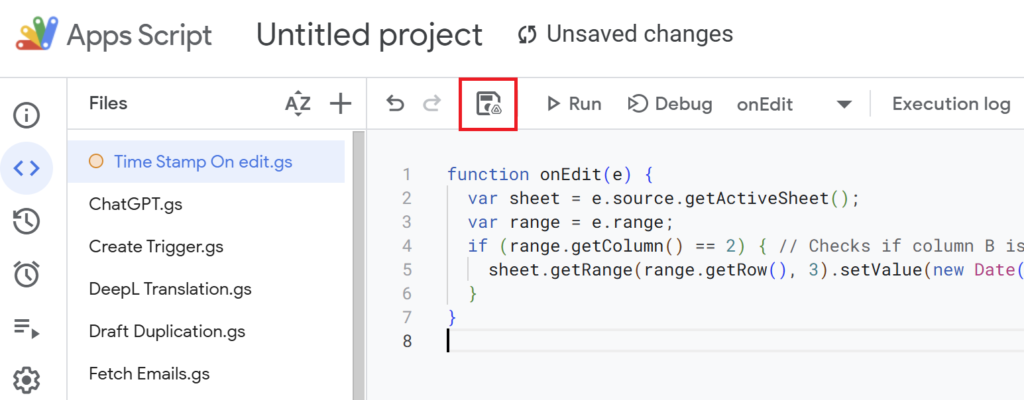
After writing the script, save it with a descriptive name.
(Example: “Timestamp (On Edit)”)

When you return to your spreadsheet, a timestamp will automatically be inserted into column C every time column B is edited.
Since the timestamp is recorded simultaneously with the edit, this helps prevent any oversights in your workflow.
Method 3: Inserting Timestamps by Running Google Apps Script

You can also run a Google Apps Script to insert timestamps for a specific range.
For example, after entering data in column A, running the script will insert timestamps in column B.
function addTimestamp() {
  const sheet = SpreadsheetApp.getActiveSpreadsheet().getSheetByName('Sheet1'); // Access the sheet named 'Sheet1'
  const range = sheet.getRange('A2:A10'); // Define the range A2 to A10
  const values = range.getValues(); // Retrieve the values in the range

  for (let i = 0; i < values.length; i++) {
    if (values[i][0] !== '') { // Check if the cell in column A is not empty
      sheet.getRange(i + 2, 2).setValue(new Date()); // Insert the current timestamp in column B
    }
  }
}
Script Description
getSheetByName('Sheet1'):-
- Retrieves a specific sheet named ‘Sheet1’ from the active spreadsheet.
- If your sheet has a different name, you need to replace
'Sheet1'with the correct name.
sheet.getRange('A1:A'):-
- Selects the entire range of column A in the sheet named
'Sheet1'. - This range is used to process all the data entered in column A.
- Selects the entire range of column A in the sheet named
values = range.getValues():-
- Fetches all the values in column A and stores them as a two-dimensional array.
- Each cell’s content is stored as an element of the array, which is then used in the loop.
forloop:-
Iterates through all the cells in column A to perform specific actions.
if (values[i][0] !== ''):-
- Executes the subsequent actions only if the cell in column A contains data.
- This ensures that timestamps are not added to empty cells.
sheet.getRange(i + 1, 2).setValue(new Date()):-
- Inserts the current date and time as a timestamp into column B.
- The
i + 1adjustment ensures that the correct row in column B corresponds to the row in column A being processed (since arrays in JavaScript are zero-indexed).
How to Run the Script

Input data into column A of the spreadsheet.

Open a Google Spreadsheet and click on “Extensions” in the menu, then “Apps Script” to open the Apps Script editor.

Since the default function myFunction() {} is present, delete it and replace it with the script above.
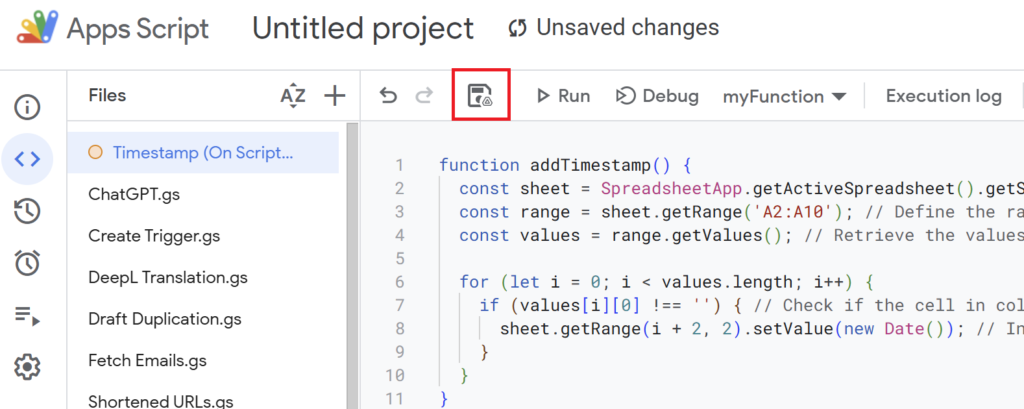
After writing the script, save it with a descriptive name.
(Example: “Timestamp (On Script Execution)”)
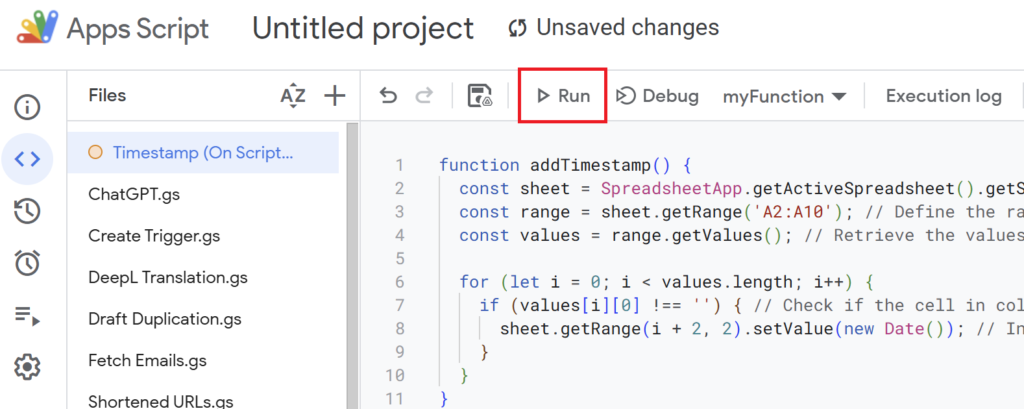
When you execute the script, timestamps will be added to column B.

Timestamps will be added to column B for the corresponding cells with data in column A.
This method is useful for bulk-inserting timestamps into a specific range.
Practical Use Case for Timestamps
Adding Timestamps When Sending Emails with Apps Script

Using Google Apps Script, you can automate email sending and add timestamps after each email is sent. This allows you to keep a record of your email history, preventing duplicate sends and making it easy to track who received an email and when.

Adding Timestamps When Bulk Deleting Files with Apps Script

Using Google Apps Script, you can automate bulk file deletion and add timestamps after each file is deleted. This creates a deletion history, making it easy to track which files were deleted and when, simplifying file management.

Adding Timestamps When Changing File Permissions


With Google Apps Script, you can use timestamps when bulk-changing file permissions directly from a spreadsheet. This helps you track when permissions were updated, ensuring proper and organized file access management.
Conclusion
Timestamps are a powerful tool for recording data entry times and managing task history or progress tracking. From manual entry to automated solutions, there are various methods to choose from based on your workflow needs.
By incorporating timestamps, you can achieve more efficient management and organization in your Google Sheets.
Our company offers support for improving work efficiency through the use of Google Apps Script.
If you need assistance with Google Apps Script customization or error resolution, please feel free to contact us.
We are fully committed to supporting your business improvements.
Contact us here





Comments